
Hello out there!
Well, it has been a while. About time I posted something, huh? Have been working on a big 40k army, a second half of the Hexfleet Virules army I did a few years ago. Will save thoughts on that for later as much as I may be compelled to write already. Thought it time to get to a new backdrop a little before the army is finished.
Since I lost all of my backdrops in the fire, naturally I needed to pop out some new ones. Many years of work and collecting gone in front of me on one hand. On the other an opportunity and fresh start, a chance to start at new from a later point of experience and desire. Forest fires bring out the greenest of new growth. It is really however you want to look at it, and I genuinely prefer the positive. Not just as a means of coping. There are many poetic shifts to the situation, and silver linings. Someday I will have to come back to the subject. Necessity is the mother of invention. I did, truly, miss necessity. I missed that place. It feels amazing and it is where I belong. Need and hunger always beget more creativity than luxury. It is why sequels suck, barring a very psychologically unique creator. I digress.
But enough of that. Let's build some stuff!

First thing's first, a cabinet. I did not always build the cabinet frame, but it felt fitting. Let's go clean for the first round back. Roughly 4 feet each dimension. As time went on I learned that vertical was best for photography. Instead of the models being on a large flat plane, a stair step allowed much better pictures of the same amount of figures. So we go what may be the most vertical that I have done yet. Will figure out the guts and an actual plan later.

If you have been around a while, you might remember many years ago instead of the huge solid backdrops I used loose buildings and made new scenes out of them each time. I moved on from that a long time ago and built dedicated backdrops, but never got rid of the buildings. They were in a closet in the house and survived the fire, so it seemed a little fitting to use them in a new base display. A display that was big and general purpose urban is always something I really wanted to do as well, but never got around to it. Generic in the sense of multiple settings, from near future urban to 40k, but still interesting to look at itself. Seems like perfect timing for that.

Getting a little ahead of myself, but as I stewed on the building placement I went ahead and cut the sidewalk. 2mm plasticard, nice and thick. Scored edges and then to be roughed up more later. With a bit of putty work the thickness will shine. A street and sidewalk will give room for any later armies with vehicles, and anchor the scene and give it a little motion. A fly by of one side of a city block.
 |
The usual look when I am busy, asking for attention without being direct. Because it works.

Something coming together. Was admittedly a little bit rusty. Had to just start making things to knock it off in the beginning and get something going, and did a few boxes and things I liked in a bubble, but not necessarily direct intent or planned. The top right control tower sort of thing was one, and never made it for good reason but thought it good to show the process. Good creativity is throwing 1000 things at a a broad idea and seeing how they feel, searching for the one that sticks, even if you know some of the other 999 are awful. There is value in seeing through even the bad ideas.

The overall process starts to click, and the fog begins to clear. Things start falling into place as I go. A parking garage would be good front, low and center, in theory going off into the distance.

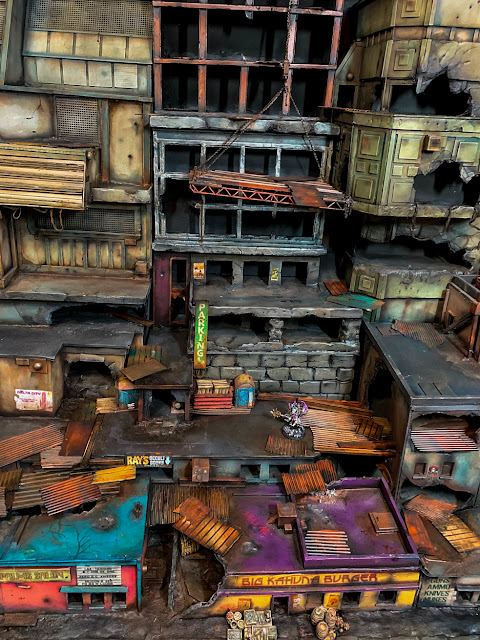
Now, let's connect that to the building in front and add an elevator. Liking this so far. One payoff of sitting and staring at it for a while is things fall in and feel natural. Moving the medium building in the front to the left offsets it from Big Kahuna and is a little more interesting. Can fill the gap with platform since this is a dystopian sort of setting anyway.

As usual for these things I get a little excited and forget to take pictures. But a day or two later the rough feel for it falls into place and I am happy. Details will come after, but this works as a baseline structure. Building it in layers and chunks works well to make it a little more alive.

One thing that was important for this one was working in parts I am getting too old and crotchety to paint these things solid, and this one was a little more complicated than usual. So the back is three separate vertical structures that lock into each other, and later will be glued into the back.

One benefit as well of doing this in three chunks is avoiding making things overly complicated and interlocked. I do have a strange habit, as seen in past displays, of making everything a wall of Tetris, for lack of a better way of putting it. Working in three vertical structures forced me away from that, and gave me an opportunity to make each unique, when my creative autopilot would have leaned toward a wall of solid semi Escher painting. This also feels more realistic and fun than what would have surely come about if I just went at it solid. The bonus reward is added realism and life.


Starting a little bit of putty work. Even in the upper areas, putty is important. It helps blend the obvious structure of foamboard into a realistic setting. A little bit goes a long way. A touch of grainy putty turns a joint of obvious material into a realistic structure.

These are still loose, but testing them each time, seeing how they interact. Stuff is cattywampus since it is just free sitting, but the final glue will take care of any bit off level.

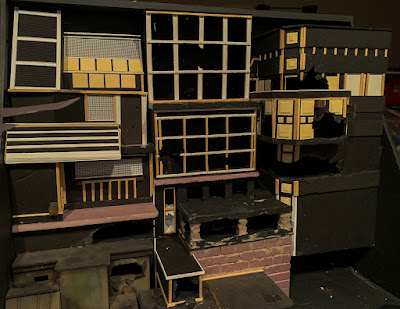
Little bit of primer on the back buildings before I get much further. Can clearly see the three different structures. Definitely want to paint these before sticking them in, and primer is a good setup color wise. It doesn't need it for the protection, these are always treated with care and not much harm comes to them in setting up scenes, it is more to set a very very early baseline for color I apply after. Pure black isn't often something I do for miniatures, but for terrain a level playing field is good. That is an entirely different tangent though.

One final look, half test half celebratory, before I get to paint.

Worked right to left on paint. Likely part that since they were built the same direction, had proportional time to stew on how I wanted them to look in the end. I want each to be clearly different, but work with each other as well. I like the somewhat between military green and stone grey of used future buildings. I also like the same sort of palette tweaked blue and tan as a balance. So knew I wanted each on left and right, and then get literal in the center with balanced metals and whiteish stone.

As before, got a little excited and did not take enough photos. But there is the rough of getting the buildings in. Very happy with the separation and on multiple levels glad I went that way. Little loose test of all the front buildings and time to move on to the sidewalk now that I know for sure where those land.
The back buildings are adhered first with a little hot glue to level them out, and then the back wall of thinner (only half inch) extruded pink foam plays it's part - drilling tiny holes and spraying in expanding sealer foam. Gap filler foam obviously fills gaps, but that isn't why I use it here. It is a wonderful spray and pray method of adhesion. It grips like superglue and catches where you put it. Instead of trying to play hot glue's short cool time over such a large area, or liquid nails' slow cure on the back end, just spray some gap filler in the back pockets and wait overnight. There is something in the expanding nature that someone more physics oriented could figure out, but I go by feel, of weighing down the buildings with boards having more weight than the expanding pressure of the foam so they do not push out. That is all one has to worry about, but minimal, and in the end the bond is secure. I could throw the whole thing down a hill and not move. Hooray.

How to texture plasticard sidewalk the right way in one easy step.

Hot glued. I prefer hot glue here because very thick it adds variance, which will be covered and filled later with putty. Just adds character. Hot glue is a perfectly fine bond as long as you are dealing with either smaller parts or multiple or large points of contact. It is also quick and I am impatient with these things out of excitement. I use hot glue for almost everything, especially if it will get a putty or some other secondary bond later.

All stuck in.

First layer of putty. I use Smooth On Free Form for most terrain. It takes everything from glass smooth to grainy concrete well, and multiple layers blend well. Which is important so stuff gets locked in. The trick to stone grain is a wet rag.

After the sidewalk layer cured, started sticking in buildings. Another benefit of the Smooth On is it is also an incredible adhesive. After laying down the layer of putty I just stick the buildings in and touch up texture around with a rag or worn brush. I could pick the whole thing up by that building and it is the only adhesive.

Rest of them, overlapping layers as I go. Easy and fun.
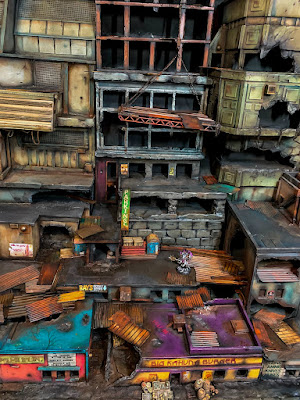
Now ready for the next painting step of blending all that putty in and weathering the buildings. Looks like once again I got too into it and did not take pictures. So we move on.

Now for that tertiary step I talked about. Cutting up random metals and I beams and painting them with variance. This step doesnt have to be slow if you vary and stagger the steps of painting. Do not paint them in batches. A dozen different blends of color going darker at each step, and never giving any one part more than 6-8 means you paint all the stuff at the same time but still different. A dehumidifier also goes a long way in steps like these.

Added details go a long way beyond the basic structure and paint. Some of this stuff is old items I had as well. Just a little personal nostalgia and they still hold up great.

I love this crane. This was designed by Alex at Ironheart Artisans, a buddy of mine. Thought it would be a nice touch and add vertical space which is always gold in a backdrop. We also made the old big red Admech, martian display together and it was a nice little touch of throwback. That is the one backdrop I will certainly remake. Someday.


That is it. See you next time with an army on it.
"The trick, William Potter, is not minding that it hurts." - Lawrence


